
Amazon SageMaker is extremely popular for data science projects which need to be organized in the cloud. It provides a simple and transparent way to try multiple models on your data.
Great news is that it becomes even cheaper to train and deploy models using SageMaker (up to 18% reduction on all ml.p2.* and ml.p3.* instance types) so it makes it even more suitable for integration with your existing production AWS infrastructure. It could be the case that you want to train your model automatically on-demand or retrain the model based on some changes in your data.
There are multiple challenges associated with this task:
- First, you need a way to organize preprocessing and postprocessing steps for training the model. The former could include ETL latest data and the latter could include updating or registering models in your system.
- Second, you need a way to handle long-running training tasks in an asynchronous way while also having a way to retry or restart the task in case some retriable error happened. Otherwise, you would want to handle the non-retriable error and notify that the process failed.
- Finally, you need a way to run multiple tasks in parallel in a scalable way in case you need to handle the retraining of multiple models in your system.
AWS Step Functions provide a way to tackle these challenges by orchestrating deep learning training workflows, which can handle the multi-step process with custom logic like retries or error handling while also providing a way to use together with different AWS services for computing like Amazon SageMaker, AWS Batch, AWS Fargate and AWS Lambda. It has nice additional features like scheduling the workflow or using it with AWS EventBridge to integrate with other services that you could use, for example, for notification purposes.
In this post, I’ll cover a method to build a serverless workflow using Amazon SageMaker with a custom docker image to training a model, AWS Lambda for preprocessing and postprocessing, and AWS Step Functions as an orchestrator for the workflow.
We will cover the following:
- Using Amazon SageMaker for running the training task and creating custom docker image for training and uploading it to AWS ECR
- Using AWS Lambda with AWS Step Functions to pass training configuration to Amazon SageMaker and for uploading the model
- Using serverless framework to deploy all necessary services and return link to invoke Step Function
Prerequisites:
- Installed AWS CLI
- Installed docker
- Installed serverless frameworks with plugins
Code decomposition:
- Container folder which contains Dockerfile for building the image and train script for model training
- Index.py file which contains code for AWS Lambdas
- Serverless.yml file which contains configuration for AWS Lambda, execution graph for AWS Step Functions and configuration for Amazon SageMaker
Using Amazon SageMaker for running the training task
Amazon SageMaker provides a great interface for running custom docker image on GPU instance. It handles starting and terminating the instance, placing and running docker image on it, customizing instance, stopping conditions, metrics, training data and hyperparameters of the algorithm.
In our example, we will make a container for the training classification model for fashion mnist dataset. The training code will look like classic training example, but will have two main differences:
- Import hyperparameters step
with open('/opt/ml/input/config/hyperparameters.json') as json_file:
    hyperparameters = json.load(json_file)
    print(hyperparameters)
- Saving the model to S3 step
model.save('/opt/ml/model/pipelineSagemakerModel.h5')
Here is how the dockerfile will look like:
FROM tensorflow/tensorflow:1.12.0-gpu-py3
RUN pip3 install boto3
ENV PATH="/opt/ml/code:${PATH}"
COPY . /opt/ml/code/
WORKDIR /opt/ml/code
RUN chmod 777 /opt/ml/code/train
Here is how we will build and push the image to AWS ECR (you would need to replace accountId and regionId with account and region id):
git clone https://github.com/ryfeus/stepfunctions2processing.git
cd aws-sagemaker/container
docker build -t aws-sagemaker-example .
$(aws ecr get-login --no-include-email --region us-east-1)
aws ecr create-repository --repository-name aws-sagemaker-example
docker tag aws-sagemaker-example:latest <accountId>.dkr.ecr.<regionId>.amazonaws.com/aws-sagemaker-example:latest
docker push <accountId>.dkr.ecr.<regionId>.amazonaws.com/aws-sagemaker-example:latest
Using AWS Lambda with AWS Step Functions to pass training configuration to Amazon SageMaker and for uploading the model
In our case, we will use preprocessing Lambda to generate a custom configuration for the SageMaker training task. This approach can be used to make sure that we have a unique name for the SageMaker task as well as generate a custom set of hyperparameters. Also, it could be used to provide a specific docker image name or tag or to provide a custom training dataset.
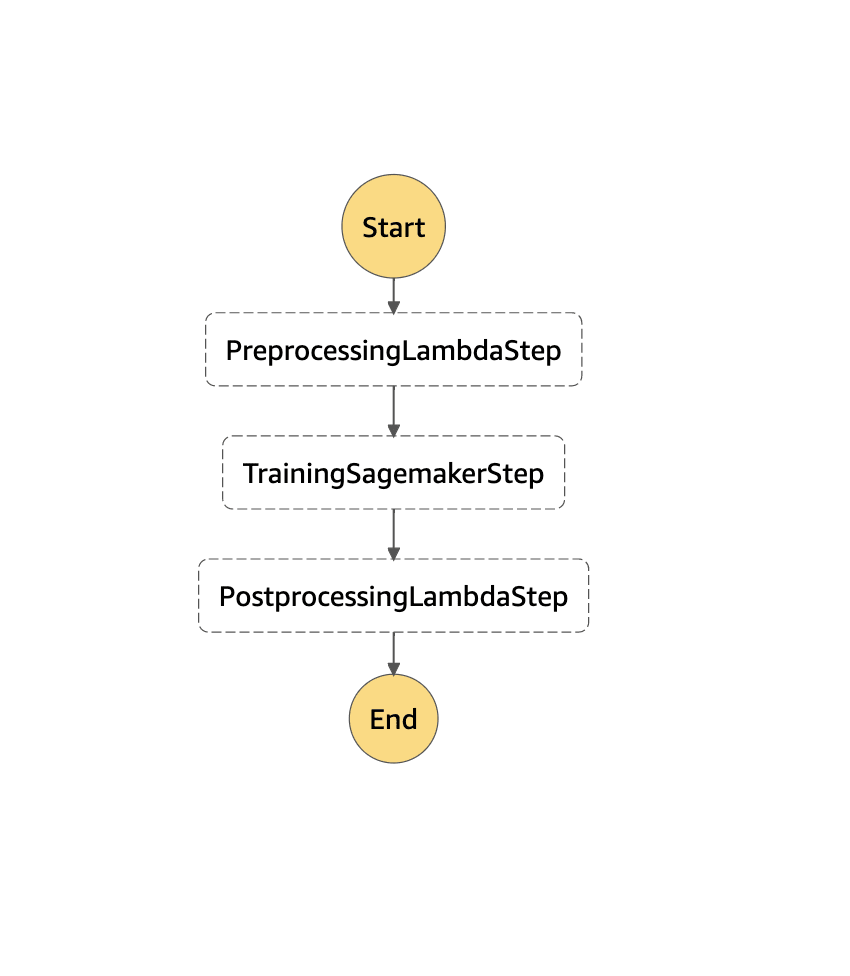
In our case the execution graph will consist of the following steps:
- Preprocessing step which will generate config for the SageMaker task
- SageMaker step which will run the training job based on the config from the previous step
- Postprocessing step which can handler model publishing
Here is how the config for the Step Functions will look like. As you can see we define each step separately and then define what the next step in the process is. Also, we can define some parts of the SageMaker training job definition in its state config. In this case, we define instance type, docker image and whether to use Spot instance in the config.
stepFunctions:
  stateMachines:
    SagemakerStepFunction:
      events:
        - http:
            path: startFunction
            method: GET
      name: ${self:service}-StepFunction
      role:
        Fn::GetAtt: [StepFunctionsRole, Arn]
      definition:
        StartAt: PreprocessingLambdaStep
        States:
          PreprocessingLambdaStep:
            Type: Task
            Resource:
              Fn::GetAtt: [preprocessingLambda, Arn]
            Next: TrainingSagemakerStep
          TrainingSagemakerStep:
            Type: Task
            Resource: arn:aws:states:::sagemaker:createTrainingJob.sync
            Next: PostprocessingLambdaStep
            Parameters:
              TrainingJobName.$: "$.name"
              ResourceConfig:
                InstanceCount: 1
                InstanceType: ml.p2.xlarge
                VolumeSizeInGB: 30
              StoppingCondition:
                MaxRuntimeInSeconds: 86400
                MaxWaitTimeInSeconds: 86400
              HyperParameters.$: "$.hyperparameters"
              AlgorithmSpecification:
                TrainingImage: '#{AWS::AccountId}.dkr.ecr.#{AWS::Region}.amazonaws.com/aws-sagemaker-example:latest'
                TrainingInputMode: File
              OutputDataConfig:
                S3OutputPath: s3://sagemaker-#{AWS::Region}-#{AWS::AccountId}/
              EnableManagedSpotTraining: true
              RoleArn: arn:aws:iam::#{AWS::AccountId}:role/SageMakerAccessRole
          PostprocessingLambdaStep:
            Type: Task
            Resource:
              Fn::GetAtt: [postprocessingLambda, Arn]
            End: true
Here is how the execution graph will look like in the AWS Step Functions dashboard.
Here is how the AWS Lambda code will look like. Since Amazon SageMaker requires all training jobs to have unique names, we will use random generator to generate unique string.
import random
import string
from datetime import datetime

def handlerPreprocessing(event,context):
    letters = string.ascii_lowercase
    suffix = ''.join(random.choice(letters) for i in range(10))
    jobParameters = {
        'name': 'model-trainining-'+str(datetime.date(datetime.now()))+'-'+suffix,
        'hyperparameters': {
            'num_of_epochs': '4'
        }
    }
    return jobParameters

def handlerPostprocessing(event,context):
    print(event)
    return event
Using serverless framework to deploy all necessary services and return link to invoke Step Function
We will use the serverless framework to deploy AWS Step Functions and AWS Lambda. There are following advantages of using it for deploying serverless infrastructure:
- Usage of plugins which provides a way to deploy and configure AWS Step Functions
- Resources section which enables to use cloudformation notation to create custom resources
We can install dependencies and deploy services by using the following command:
cd aws-sagemaker
npm install
serverless deploy
Here is how the output will look like:
Serverless: Packaging service...
Serverless: Excluding development dependencies...
Serverless: Creating Stack...
Serverless: Checking Stack create progress...
.....
Serverless: Stack create finished...
Serverless: Uploading CloudFormation file to S3...
Serverless: Uploading artifacts...
Serverless: Uploading service DeepLearningSagemaker.zip file to S3 (35.3 KB)...
Serverless: Validating template...
Serverless: Updating Stack...
Serverless: Checking Stack update progress...
.............................................
Serverless: Stack update finished...
Service Information
service: DeepLearningSagemaker
stage: dev
region: us-east-1
stack: DeepLearningSagemaker-dev
resources: 15
api keys:
  None
endpoints:
functions:
  preprocessingLambda: DeepLearningSagemaker-dev-preprocessingLambda
  postprocessingLambda: DeepLearningSagemaker-dev-postprocessingLambda
layers:
  None
Serverless StepFunctions OutPuts
endpoints:
  GET - https://<url_prefix>.execute-api.us-east-1.amazonaws.com/dev/startFunction
We can use the url in the output to call deployed AWS Step Functions and Amazon SageMaker. It could be done, for example, by using curl:
curl https://<url_prefix>.execute-api.us-east-1.amazonaws.com/dev/startFunction
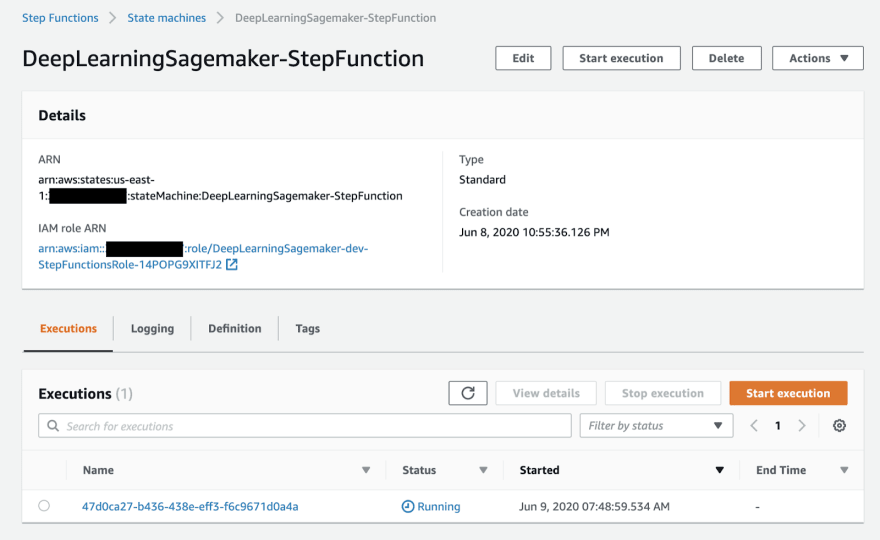
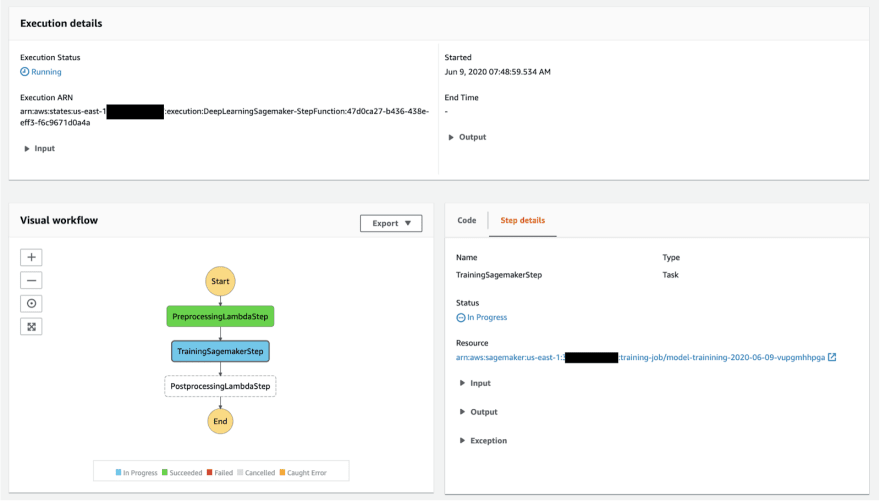
After that, we can take a look at Step Functions execution graph at AWS Step Functions dashboard (https://console.aws.amazon.com/states/home) and review the training job at Amazon SageMaker dashboard (https://console.aws.amazon.com/sagemaker/home).
AWS Step Functions dashboard:
Amazon SageMaker dashboard:
Conclusion
We’ve created a deep learning training pipeline using Amazon SageMaker and AWS Step Functions. Setting everything up was simple, and you can use this example to develop more complex workflows, for example by implementing branching, parallel executions, or custom error handling.
Feel free to check the project repository at https://github.com/ryfeus/stepfunctions2processing.


Top comments (0)