AWS Open Source Blog
AWS ParallelCluster post-install: EnginFrame and DCV Session Manager Broker
With the newest tools and services provided by AWS, such as AWS ParallelCluster, you can set up a fully functional high-performance computing (HPC) cluster in minutes. ParallelCluster not only simplifies the process of setting up and running technical and scientific applications, it also takes advantage of the power, scale, and flexibility of the cloud and lets you seamlessly migrate your existing HPC environment and workflow into AWS.
A standard ParallelCluster deployment provides users with a bare SSH command line. The aim of this post is to add the NICE EnginFrame HPC web portal and NICE DCV Session Manager Broker for interactive sessions to ParallelCluster, as post-install operations. To get a clear view of the EnginFrame portal, refer to the post on the AWS News Blog, NICE EnginFrame – User-Friendly HPC on AWS, written by Jeff Barr.
With this automated post-install operation, users get access to a user-friendly HPC portal to control and monitor their jobs and can create and connect to interactive DCV sessions through it. This setup also removes the need to grant SSH access to clusters through password or keys.
The code for this article is available on GitHub under AWS Samples.
Software and services used
AWS ParallelCluster is an open source cluster management tool that simplifies deploying and managing HPC clusters with Amazon FSx for Lustre, Elastic Fabric Adapter (EFA), a variety of job schedulers, and the MPI library of your choice. ParallelCluster simplifies cluster orchestration on AWS so that HPC environments become easy to use even if you’re new to the cloud.
NICE EnginFrame is an advanced web front end for accessing technical and scientific applications in the cloud. It includes sophisticated data management for all stages of HPC job lifetime and is integrated with most popular job schedulers and middleware tools to submit, monitor, and manage jobs.
NICE DCV is a remote visualization technology that enables users to securely connect to graphic-intensive 3D applications hosted on a remote, high-performance server. With NICE DCV, you can make a server’s high-performance graphics processing capabilities available to multiple remote users by creating secure client sessions.
NICE DCV Session Manager is set of two software packages (an Agent and a Broker) and an application programming interface (API) that makes it easy for developers and independent software vendors (ISVs) to build front-end applications that programmatically create and manage the lifecycle of NICE DCV sessions across a fleet of NICE DCV servers.
Solution overview
We’ll add the following two options to our ParallelCluster configuration file:
The first one, post_install, specifies a Bash script stored on Amazon Simple Storage Service (Amazon S3) as ParallelCluster post-install option. This is my main script that will run secondary scripts for EnginFrame and DCV Session Manager broker respectively.
The second parameter, post_install_args, passes a set of arguments to the above script:
- The Amazon S3 bucket repository.
- The Amazon S3 bucket key identifying the location of the secondary scripts.
- The password for EnginFrame administrator user, named efadmin. This password will be required to log into the EnginFrame portal the first time. This argument can be considered as optional (for example, if setting ec2-user as administrator), or stored in AWS Secrets Manager, but for the scope of this post and as an example I’ll specify it here.
A secondary script will get those arguments, detect all the other information required, and proceed with the installation of the two components on the ParallelCluster master host.
EnginFrame and DCV Session Manager Broker secondary scripts are separated, so you can potentially install just one of them.
Note: This procedure has been tested with EnginFrame version 2020.0 and DCV Session Manager Broker version 2020.2. With modifications, however, it can work with previous versions; just remember to add the license management.
Walkthrough
Requirements
To perform a successful installation of EnginFrame and DCV Sesssion Manager broker, you need:
- An Amazon S3 bucket, made accessible to ParallelCluster via its
s3_read_resourceors3_read_write_resource[cluster]settings. Refer to ParallelCluster configuration for details. - An EnginFrame efinstall.config file, containing the desired settings for EnginFrame installation. This enables the post-install script to install EnginFrame in unattended mode. An example efinstall.config is provided in this post code; you an review and modify it according to your preferences. Alternatively, you can generate your own by performing an EnginFrame installation. In this case, an efinstall.config containing all your choices will be generated in the folder where you ran the installation.
- A security group allowing EnginFrame inbound port. By default ParallelCluster creates a new master security group with just port 22 publicly opened, so you can either use a replacement (via ParallelCluster
vpc_security_group_idsetting) or add an additional security group (additional_sgsetting). In this article, I’ll specify an additional security group. - ParallelCluster configuration including
post_installandpost_install_argsas mentioned previously and described later with more details. - EnginFrame and DCV Session Manager packages (optional), which you can download from the EnginFrame site. Having them in the bucket avoids the need for outgoing internet access for your ParallelCluster master to download them. In this article, I’ll instead have them copied into my target S3 bucket. My scripts will copy them from S3 to the main node.
Note: Neither EnginFrame 2020 or DCV Session Manager Broker need a license if running on Amazon Elastic Compute Cloud (Amazon EC2) instances. For more details, please refer to their documentation.
Step 1. Review and customize post-install scripts
The GitHub code repository for this article contains three main scripts:
- post.install.sh: Primary post-install script, preparing the environment and launching secondary scripts in alphanumerical order.
- 01.install.enginframe.master.sh: Secondary script installing EnginFrame. Most installation parameters are up to
efinstall.configscript. - 02.install.dcv.broker.master.sh: Secondary script installing DCV Session Manager Broker.
Secondary scripts follow this naming convention: They start with a number that will set their execution order, then they describe their purpose, and finally define the node type in which they should be executed (master or compute) as a last argument, just before the extension. For example:
While the main post-install script (post.install.sh) just sets environment variables and launches secondary scripts, you might want to check the secondary ones: 01.install.enginframe.master.sh installing EnginFrame and 02.install.dcv.broker.master.sh installing DCV Session Manager Broker. More information can be found in the “Post-install scripts details” section of this post.
Crucial parameters are set in the ParallelCluster configuration file, and EnginFrame settings are defined into efinstall.config file. All these files should be checked to reflect what you have in mind.
We can add further custom scripts, in the same folder, following the naming convention stated above. An example could be installing an HPC application locally on a compute node, or in the master shared folder.
Each script sources /etc/parallelcluster/cfnconfig to get the required information about current cluster settings, AWS resources involved, and node type. Specifically, cfnconfig defines:
cfn_node_type=MasterServerif current node is the master nodecfn_node_type=ComputeFleetif current node is a compute node
Step 2. Prepare the S3 bucket
We’ll create an S3 bucket (for example, mys3bucket) with the following structure and contents in a prefix of choice (packages names and version numbers may vary):
Step 3. Modify or create the ParallelCluster configuration file
As mentioned, the only settings required by our scripts are the following in the [cluster] section: post_install, post_install_args , and s3_read_resource:
The post.install.sh main script is set as the post_install option value, with its S3 full path and provided arguments:
- Bucket name
- Bucket folder/key location
efadminuser (primary EnginFrame administrator) password
with each argument separated by space. All post-install arguments must be enclosed in a single pair of single quotes, as in the example code.
Note: ParallelCluster documentation suggests using double quotes for post_install_args. This is not working with the last version of ParallelCluster available when writing this article, so I’m using single quotes. This is under fixing and will probably change in near future.
Finally, the s3_read_resource option grants the master access to the same S3 location to download secondary scripts: first one installing EnginFrame (01.install.enginframe.master.sh) and second one installing DCV Session Manager broker (02.install.dcv.broker.master.sh). You may want to associate a custom role to the ParallelCluster master instead of using the s3_read_resource option.
A configuration file sample is provided under the parallelcuster folder of the GitHub repository.
Step 4. Create ParallelCluster
You can now start ParallelCluster creation with your preferred invocation command, as follows:
Hint: When testing, you may want to disable rollback as shown in the above command line. This will allow you to connect via SSH to the master instance to diagnose problems if something goes wrong with the post-install scripts.
Step 5. Connect to EnginFrame
If the ParallelCluster creation is successful, you can reach EnginFrame on master host: https://<master IP address>:8443
The master IP address is reported in:
pcluster createcommand output- ParallelCluster CloudFormation stack, Outputs tab, MasterPublicIP
- EC2 Instances, Master instance, Details, Public IPv4 address
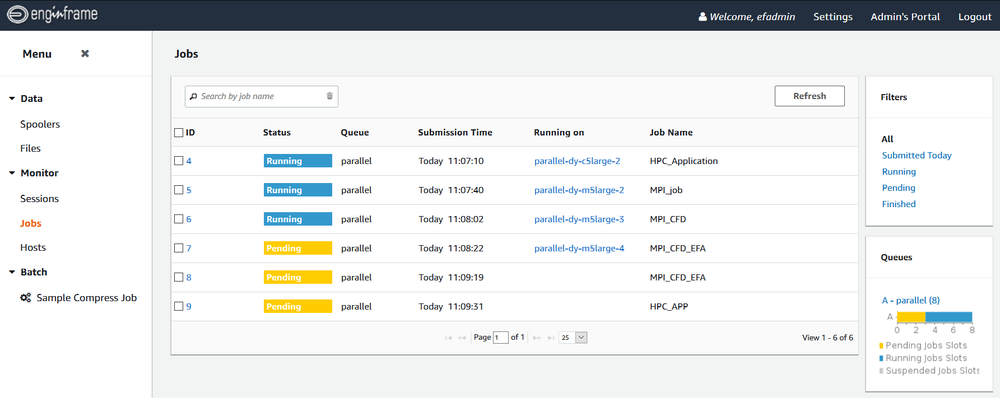
If everything worked fine, we can use EnginFrame portal to submit our HPC jobs:
Cleaning up
To avoid incurring future charges, we can delete idle ParallelCluster instances via its delete command:
Post-install scripts details
In this section, I’ll list more detail on the scripts logic. This information could be a starting point in customizing, evolving, or adding more secondary scripts to the solution. For example, you might want to add a script to automatically install an HPC application into ParallelCluster master node.
Main post.install.sh
The post-install script, post.install.sh, goes through the following steps:
- Gets post-install arguments and exports them as environment variables, in particular:
- Downloads the entire scripts subfolder from the S3 bucket into master node
/tmp/scriptsfolder. - Runs every script in
/tmp/scriptsin alphanumerical order.
EnginFrame
The provided 01.install.enginframe.sh script performs the following steps:
- Installs
openjdk(required for EnginFrame). - Downloads the packages subfolder of the bucket into
/tmp/packages, so it gets EnginFrame installer and also any other secondary script in advance. - Checks whether EnginFrame installer and
efinstall.configare available under/tmp/packages. - Inline modifies its
efinstall.configcopy to install EnginFrame under ParallelCluster shared foldercfn_shared_dir. - Adds
efadminandefnobodylocal users, again required by EnginFrame. Setsefadminpassword if present. If not present, you should set it later, for example, by connecting via SSH to the master node. - Installs EnginFrame in unattended mode into the ParallelCluster shared folder.
- Enables and starts EnginFrame service.
DCV Session Manager Broker
The provided 02.install.dcv.broker.master.sh script performs the following steps:
- Downloads the packages subfolder of the bucket into
/tmp/packages. - Checks whether NICE-GPG-KEY and DCV Session Manager Broker package are available under
/tmp/packages. - Imports NICE-GPG-KEY and installs DCV Session Manager Broker rpm.
- Modifies broker configuration to switch port to 8446 because 8443 is used by EnginFrame.
- Enables and starts DCV Session Manager Broker service.
- Copies DCV Session Manager Broker certificate under
efadmin’s home.
Optionally, if EnginFrame is installed, it:
- Registers EnginFrame as API client.
- Saves API client credentials into EnginFrame configuration.
- Adds DCV Session Manager Broker certificate into Java keystore.
- Restarts EnginFrame.
Troubleshooting
Detailed output log is available on the master node, in:
/var/log/cfn-init.log/var/log/cfn-init-cmd.log
You can reach it via SSH, after getting the master node IP address from AWS Console, EC2, Instances and looking for an instance named Master.
Conclusions
We showed how to automatically install EnginFrame and DCV Session Manager Broker via an AWS ParallelCluster post-installation script. You can customize these scripts, adapting them to your environment and target cloud infrastructure.
Because the scripts are executed in alphanumerical order, with their names starting with a growing number, you can add more scripts performing further actions into your HPC clusters with minimal effort.