AWS Database Blog
Migrating your SQL Server database to Amazon RDS for SQL Server using AWS DMS
If you have mission-critical workloads running on an on-premises Microsoft SQL Server database, you may be looking for ways to migrate to AWS while keeping the same database engine (homogeneous migration) with minimal to near-zero downtime. This post provides a solution for migrating your on-premises SQL Server database to Amazon RDS for SQL Server using the SQL Server backup and restore method in conjunction with AWS Database Migration Service (AWS DMS) to minimize downtime. This method is useful when you have to migrate the database code objects, including views, stored procedures, and functions, as part of the database migration. This solution is applicable to SQL Server of any database size. It keeps the database available for the application during migration and when you need to perform validation on the target database while the data is getting replicated from source to target, thereby saving time on data validation. However, you can only use this solution when there are no limitations on using SQL Server as a source for AWS DMS.
Solution overview
The solution uses an Amazon Elastic Compute Cloud (Amazon EC2) with SQL Server database engine installation, considered as the on-premises source database and Amazon RDS for SQL Server as the target database for migration.
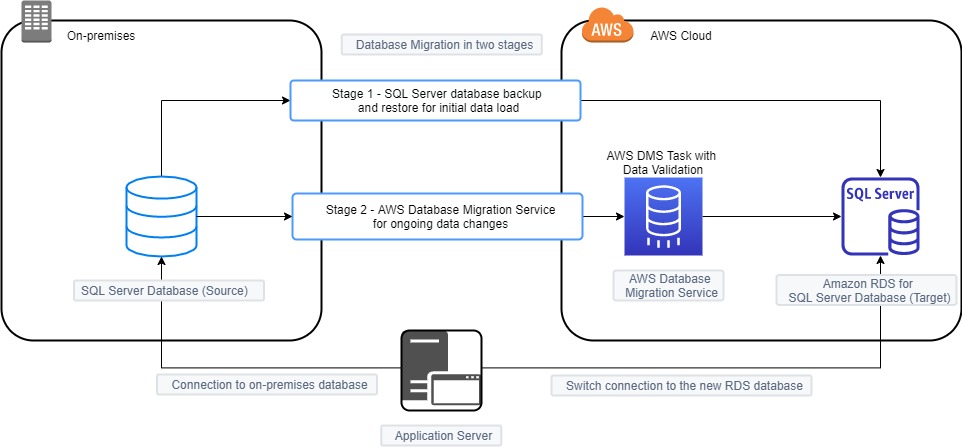
To minimize downtime, we take a two-stage approach for database migration, as described in the following diagram. The initial stage uses SQL Server full backup and Amazon RDS database restore. This stage creates the entire SQL Server database in Amazon RDS with existing data. The first stage restores all data to when the SQL Server database backup was taken at the source and doesn’t contain data changes, thereafter to be applied to the target database. Therefore, the second stage is required to apply ongoing data changes to Amazon RDS and uses AWS DMS to replicate data changes from the on-premises database to Amazon RDS.
Prerequisites
Before you get started, you must complete the following prerequisites:
- Prepare the source SQL Server database for database migration by configuring it as a replication source for AWS DMS.
- This process uses the AWS Command Line Interface (AWS CLI) to upload files to Amazon Simple Storage Service (Amazon S3) from the on-premises SQL Server database server. Follow AWS Identity and Access Management (IAM) security best practices to grant access to Amazon S3 resources.
- At the target, add the option SQLSERVER_BACKUP_RESTORE to the Amazon RDS option group to access and restore database backup files in the S3 bucket to Amazon RDS for SQL Server.
- For the source Amazon EC2 AMI, use Windows_Server-2016-English-Full-SQL_2016_SP2_Standard-2020.06.10 (ami-0989b30cfea1588ab).
- For the target Amazon RDS for SQL Server, use SQL Server 2016 (13.00.5598.27.v1) Standard Edition.
Implementation steps
The solution consists of two stages.
Stage one includes a one-time backup and restore of the SQL Server database:
- Back up the SQL Server database from the on-premises source.
- Restore the database backup file to the target Amazon RDS for SQL Server.
Stage two uses AWS DMS for ongoing data changes:
- Create the AWS DMS replication instance and endpoints with the source and target databases.
- Create an AWS DMS task for continuous replication from the source to target database.
- Monitor the task for ongoing replication and cutover the application to use Amazon RDS for SQL Server.
Backing up the SQL Server database from the on-premises source
Take a full backup of the on-premises SQL Server database using the following code:
The log sequence number (LSN) value is a three-part, uniquely incrementing value, consisting of the following:
- A virtual log file (VLF) sequence number
- The starting offset of a log block
- The slot number
You use the LSN to maintain the sequence of the transaction log records in the database. The solution uses the LSN of the database full backup from the source SQL Server database. The following code gives the LSN of the database backup, and you use this LSN while setting up the AWS DMS task in the later steps:
The following screenshot shows the output.

Upload the database backup file to your S3 bucket using the following AWS CLI:
Restoring the database backup file to the target Amazon RDS for SQL Server
After you upload the file to Amazon S3, it’s available for Amazon RDS to restore. To restore the database, use the following code:
This step concludes the first stage of migrating the SQL Server database and existing data that was present in the database to the point when the backup was taken at the source database.
To migrate the data that changed from when the database full backup was taken, and to keep the data changes at the source database continuously applied to the target Amazon RDS, the second stage uses AWS DMS.
Creating an AWS DMS replication instance and endpoints with the source and target databases
Create a replication instance that has sufficient storage and processing power to perform the tasks you assign and migrate data from your source database to the target database. For more information about choosing the right replication instance size, see Choosing the optimum size for a replication instance.
An endpoint provides connection, data store type, and location information about your data store. Create your source and target endpoints by choosing SQL Server on EC2 as the source endpoint and Amazon RDS for SQL Server as the target endpoint.
Creating an AWS DMS task for continuous replication from the source to target database
Create a task by choosing the replication instance, source database endpoint, and target database endpoint that you created in the previous steps. Because you restored a database full backup to the Amazon RDS database earlier and only have to replicate data changes, for Migration type, choose Replicate data changes only.
You now use the LSN that you captured earlier after taking the database full backup in the source database to get the start point for the migration task based on the last backup restored in Amazon RDS. In the Task settings section, for CDC start mode, select Specify log sequence number. For System change number, enter the LSN you captured earlier.

This starts processing changes from the source to target database using the LSN provided.
For Target table preparation mode, for the tables to remain unaffected if they already exist at the target, select Do nothing if it’s not selected by default.
It is optional to enable validation. When validation is enabled, AWS DMS can compare the data at the source and the target and ensures that your data is migrated accurately, however it requires additional time to complete.
Since we’re migrating ongoing changes for the entire database, we use a wild card (%) in the selection rules. This option includes all schemas and tables in the database for the migration task.
The AWS DMS task automatically starts upon task creation.

Monitor the task for ongoing replication and cutover the application to use Amazon RDS for SQL Server
You can monitor the task using AWS DMS metrics. When data changes in the source database start replicating to the target database, they’re replicated continuously until the AWS DMS task is manually stopped. If you have enabled validation option during task creation, AWS DMS performs data validation for tables with primary keys. You can monitor this via the Validation state column, as shown in the screenshot. For tables with no primary keys, the AWS DMS task uses SQL Server CDC. You can count the rows in the source and target databases to validate the data; this count has to match in both databases.

You can use CloudWatch to monitor the AWS DMS task for latency between the source and target databases, and choose a window when there is low latency to cut over to the target database. For more information about monitoring in CloudWatch, see Replication task metrics.
When the application is ready for cutover to start using the Amazon RDS target database, simply point the application to the target database using the Amazon RDS for SQL Server database endpoint in the AWS Cloud. For more information, see Connecting to a DB Instance Running the Microsoft SQL Server Database Engine.
All application users coming from the application are now connected to the new target Amazon RDS for SQL Server database. When all the traffic to the database is pointed to the new target database, you can stop the on-premises SQL Server database engine service and plan to decommission the on-premises SQL Server database.
Summary
The post showed how to migrate an on-premises SQL Server database to an Amazon RDS for SQL Server database using SQL Server backup, Amazon S3, Amazon RDS for SQL Server restore, and AWS DMS with near-zero downtime. You can migrate your mission-critical on-premises databases seamlessly to Amazon RDS for SQL Server in the AWS Cloud.
For more information about SQL Server migration using other methods, see
Migrate an on-premises Microsoft SQL Server database to Amazon RDS for SQL Server.
About the author
 Praveen Marthala is a Database Consultant with the Professional Services team at AWS. Praveen is passionate about building high-available, high-performance, high-security, and cost-effective databases that help customers achieve the best outcome with workloads on AWS.